
This 5 tee length, 18-hole course features L93 Bentgrass greens that are “some of the highest quality putting greens in the state”, and a spacious 20 station driving range with an excellent teeing area with grass year round, practice putting and pitching green and bunker.
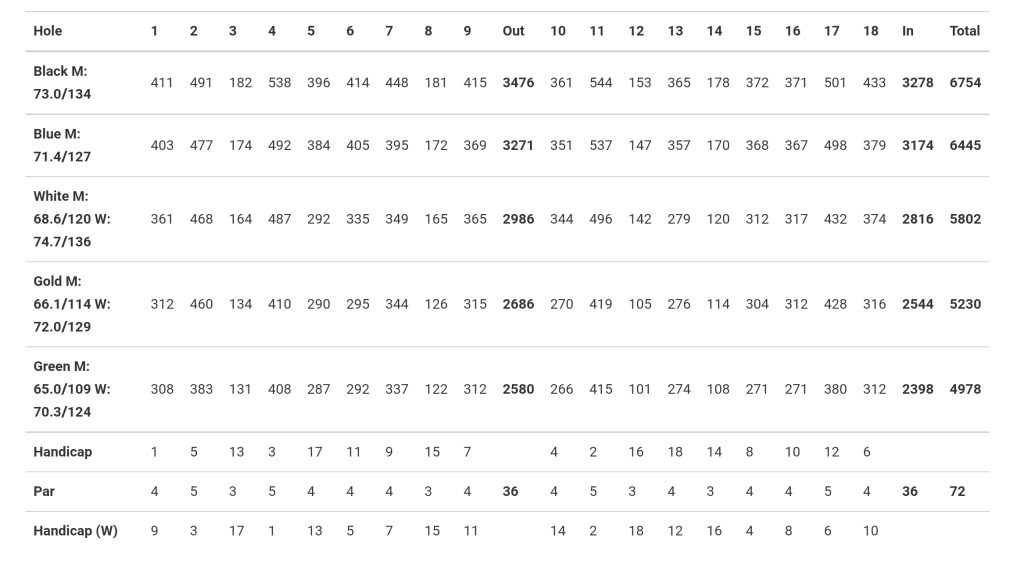
Queenfield Golf Club plays 6,754 yards from the men’s black tees. It plays to a course rating of 73.0 and a slope rating 134.
Pinch to zoom; use two fingers to change flyover angle
Range
Range
About the Hole
N/A
Hole Hacks
N/A
Tips & Tricks
N/A
Hole 1
Hole 1
About the Hole
Plays as a 411 yard par 4 from the men’s black tees.
Hole Hacks
This hole plays as the #1 handicap hole and is fairly straight away, but with a very slight dogleg left. There are no hazards to deal with off the tee. It is very rare for you to see the #1 handicap hole as your starting hole.
Tips & Tricks
Optimum position will be right center to right side of the fairway. This will provide the best angle to a green that is set back to the left of the fairway.
The green is guarded by 1 bunker, front left.
The best areas to miss will be front middle and front right of the green.
Hole 2
Hole 2
About the Hole
Plays as a 491 yard straight away par 5.
Hole Hacks
There are no hazards to deal with on this hole from tee to green, but this hole is very narrow and heavily wooded on both sides of the fairway.
Tips & Tricks
Since this hole plays straight away, the optimum position can be from the left side of the fairway all the way to the right. You will not need to try to set yourself up for any particular position or angle for a second shot.
For those longer hitters trying to reach this green in 2, the wooden tree line on the right juts in towards the green, roughly 20 yards short of the green.
For those playing this as a traditional 3 shot par 5, it pays to try to keep your second shot/lay-up, to the left center or left side for best angle at your approach.
There are no bunkers around the green to navigate.
The best areas to miss are going to be short middle, to short left of the green.
Hole 3
Hole 3
About the Hole
Plays as a 182 yard par 3.
Hole Hacks
This hole plays as a tough par 3 and requires choosing the correct club off the tee.
Tips & Tricks
There is 1 bunker that guards the front right of the green.
The best areas to miss are going to be short middle and left of the green.
Hole 4
Hole 4
About the Hole
Plays as a 538 yard par 5, dogleg right.
Hole Hacks
This is a tough par 5 that will require 3 excellent shots to get in position for a par on this hole.
Tips & Tricks
There is a tree guarding the middle right of the fairway off the tee, and you will want to make sure you stay left of this tree with your drive.
The optimum position is going to be left center to left side of the fairway.
For longer hitters that want to try to reach this green in 2, there is a hazard that runs the width of the fairway, roughly 60 to 80 yards short of the green. There is a hard dog leg to the right for your second shot, and most likely it will be a partially blind shot to the green.
For those playing this as a traditional 3 shot par 5, you will want to make sure to lay up to the left center or left side of the fairway short of the hazard.
There are no bunkers around the green to navigate.
The best areas to miss are going to be middle right and front middle.
Hole 5
Hole 5
About the Hole
Plays as a 396 yard par 4, dogleg left.
Hole Hacks
There’s a small hazard that runs directly in front of the tee that should not come into play.
Tips & Tricks
There are no bunkers to deal with in the landing area.
The optimum position off the tee will be right center to right side of the fairway.
The green does have 1 bunker guarding the front right of the green.
The best areas to miss are going to be front middle, and front left of the green.
Hole 6
Hole 6
About the Hole
Plays as a 414 yard par 4.
Hole Hacks
This hole plays fairly straight away, but does have a very slight bend to the left.
Tips & Tricks
There are no hazards to deal with off the tee.
The optimum position off the tee is going to be right center, to right side of the fairway.
There is a small hazard that runs the width of the fairway, roughly 10 to 20 yards short of the green.
There are no bunkers that guard the green.
The best areas to miss are going to be the front of the green, and middle left.
Hole 7
Hole 7
About the Hole
Plays as a 448 yard par 4, dogleg left.
Hole Hacks
Although the card says this hole plays as the number 9 handicap hole, it plays much closer to the #2. There are no hazards to navigate off the tee, but you will need to hit a good tee shot here.
Tips & Tricks
The optimum position off the tee is right center to right side of the fairway.
There is 1 bunker guarding the back right of the green.
The best areas to miss are going to be short middle, and short right.
Hole 8
Hole 8
About the Hole
Plays as a 181 yard par 3.
Hole Hacks
Par here is an excellent score.
Tips & Tricks
There is a bunker that guards the front right of the green
The best areas to miss are going to be front left, to middle left of the green.
Hole 9
Hole 9
About the Hole
Plays as a straight-away 415 yard par 4.
Hole Hacks
There are no hazards to navigate off the tee, but you will need to be accurate with your tee shot as it is heavily tree-lined down both sides.
Tips & Tricks
The optimum position off the tee will be left center to left side of the fairway.
There are no bunkers guarding this green to navigate.
The best areas to miss are going to be short middle, to short right of the green.
Hole 10
Hole 10
About the Hole
Plays as a 361 yard straight-away par 4.
Hole Hacks
This hole is an excellent opportunity to get your back 9 started off on a great note. There is 1 hazard that runs the width of the fairway, roughly 60 to 80 yds from the green.
Tips & Tricks
Longer hitters may choose to hit a fairway wood or utility club off this tee, in order to take the hazard out of play. To be safe, the maximum shot off the tee would be about 250 yds.
The optimum position off the tee is going to be right center, to right side of the fairway for the best angle at the green.
There are no bunkers guarding the green.
The best areas to miss or going to be front middle, and front right.
Hole 11
Hole 11
About the Hole
Plays as a 544 yard par-5, slight dogleg right.
Hole Hacks
There is 1 small hazard down the left side of the fairway in the landing area, that is more like a grass bunker.
Tips & Tricks
The optimum position off the tee is left center of the fairway. If you would prefer not to bring the small hazard on the left in play, then right center to right side is also an excellent position on the hole.
For longer hitters that will try to reach the green in 2, there is a hazard that runs the width of the fairway roughly 80 to 90 yards short of the green. There is also a bunker that guards the front right to the middle right of the green.
For those playing this as a traditional 3 shot par 5, you will need to make sure you lay up short of this hazard.
There is 1 bunker guarding the front to middle right.
The best areas to miss are going to be front middle, to front left.
Hole 12
Hole 12
About the Hole
Plays as a 153 yard par 3.
Hole Hacks
This par 3 plays fairly straight forward, with 1 bunker guarding the front middle left of the green.
Tips & Tricks
The best areas to miss are going to be the front middle, to front right of the green.
Hole 13
Hole 13
About the Hole
Plays as a 365 yard par 4, slight dogleg left.
Hole Hacks
There are no hazards to navigate off the tee.
Tips & Tricks
The optimum position of the tee is going to be right center to right side of the fairway.
The green is tucked back to the right of the fairway, and has no bunkers that guard the green.
The best areas to miss are going to be front middle, to front left of the green.
Hole 14
Hole 14
About the Hole
Plays as a 178 yard par 3.
Hole Hacks
This hole has a large hazard area between the tee and the green, but truly should not come into play.
Tips & Tricks
There is a bunker that guards the entire right side of the green.
The best areas to miss will be the front middle, to front left of the green.
Hole 15
Hole 15
About the Hole
Plays as a 372 yard straightaway par 4.
Hole Hacks
This is a unique par 4, as the fairway is lined on both sides by a cornfield. The cornfield on the right is just right of the cart path. There is also a small hazard just as the fairway starts, that runs the width of the fairway. This hazard truly does not come into play.
Tips & Tricks
Optimum position off the tee is left center to left side of the fairway.
This green is slightly raised from the fairway and has a bunker guarding the front left of the green.
The best areas to miss are going to be front middle, to front right.
Hole 16
Hole 16
About the Hole
Plays as a 371 yard par 4, slight dogleg right.
Hole Hacks
The left side of this hole is guarded by a cornfield that separates it from hole 15. The fairway narrows at roughly 100 yards from the green and has hazards on both the right and left.
Tips & Tricks
Longer hitters will want to lay up short of this hazard, and may consider a fairway wood or utility club off the tee.
The optimum position off the tee is going to be left center, to left side of the fairway for the best angle at your approach shot.
The green is tucked back to the right, and is guarded by a bunker in the front right and back middle of the green.
The best areas to miss are going to be front left, and middle left of the green.
Hole 17
Hole 17
About the Hole
Plays as a 501 yard par 5, slight dogleg left.
Hole Hacks
The tee box is slightly raised from the fairway, and there is a narrow gap to navigate between the tree lines. There is also a hazard running the width of the fairway.
Tips & Tricks
The optimum position of the tee is going to be left center, to right center of the fairway.
For longer hitters that try to go for the green in 2, please keep in mind there is a hazard that runs the width of the fairway, roughly 50 to 30 yards short of the green.
For those playing this as a traditional 3 shot par 5, laying up to the left center to the left side of the fairway gives you the best angle at your approach.
There is a hazard that runs the width of the fairway short of the green, as well as a bunker that guards the front middle right of the green.
The best areas to miss are short left, to middle left of the green.
Hole 18
Hole 18
About the Hole
Plays as a 433 yard par 4, slight dogleg right.
Hole Hacks
This is a demanding finishing hole that requires 4 good shots to finish with a par.
Tips & Tricks
The hole is tree-lined down the right-hand side, but the left side of this hole is wide open. There are no bunkers to deal with or navigate off the tee.
The optimum position is going to be left center to left side of the fairway.
The green is guarded by a bunker short left of the green.
The best areas to miss are going to be front middle, to front right.
