
This local destination features an 18-hole, 6,943 yard championship course designed by the well known golf architect Edmund Ault. This course also incorporates tall pines, quiet meadows, and peaceful rural ponds in a historic Southern vista.
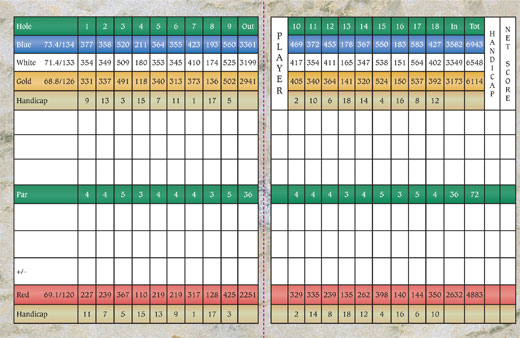
Below, Mill Quarter Plantation Golf Club was played as a 6,559 yard par 71 from the men’s white tees. From the white tees it plays to a course rating of 71.7 and a slope of 134.
Pinch to zoom; use two fingers to change flyover angle

Range
Range
About the Hole
N/A
Hole Hacks
N/A
Tips & Tricks
N/A

Hole 1
Hole 1
About the Hole
Plays as a 354 yard downhill dogleg left par 4.
Hole Hacks
This is an excellent scoring opportunity to
open up your round.
Tips & Tricks
The optimum position of the tee is going to be right center to right side of the fairway, this will provide the best angle for your approach shot.
There is a water hazard short left of the green and it does extend the entire length of the green.
There is a bunker guarding the front right of the green and one guarding the back right.
The best areas to miss are going to be front middle and short right.

Hole 2
Hole 2
About the Hole
Plays as a 349 yard slightly dogleg right par 4.
Hole Hacks
This hole provides an excellent scoring opportunity. There is a water hazard that comes into play just right of the fairway at the start of the dogleg. Longer hitters can very well reach this water hazard off the tee, you may want to consider hitting a fairway wood or utility off of this tee to avoid finding this hazard.
Tips & Tricks
There is one bunker guarding the left hand side of the fairway in the landing area.
The optimum position off the tee is going to be left center to left side of the fairway this will provide the best angle for your approach.
The green is well bunkered with one in the front left, a bunker in the back left as well as a bunker middle right.
The best areas to miss or going to be the front middle and back right of the green.

Hole 3
Hole 3
About the Hole
Plays as a 509 yard double dog leg par 5.
Hole Hacks
The tee shot on this hole plays to a very slight
dogleg left and your approach shot will be playing to a slight dogleg right. you will find that down the right hand side of this entire whole is a wooded area that has been cleared and acts more as a waist area. This does extend the entire length of the right hand side of the hole all the way up through the green.
Tips & Tricks
Optimum position off the tee is going to be right center to right side of the fairway.
For those longer headers that were able to reach the green in 2, you need to make sure that you cover the waist area to the right.
For those Playing this as a traditional three shot par 5, you want to try and lay up to the left center or left side of the fairway.
The green is guarded by two large bunkers in the front left and front right of the green.
The best areas to miss are going to be front left and back left.

Hole 4
Hole 4
About the Hole
Plays as 180 yard uphill par 3.
Hole Hacks
You have the same cleared wooded area almost as a
waste area down the right side of this hole all the way up through the green.
Tips & Tricks
The green is guarded by one large bunker guarding the entire front of the green.
The best areas to miss are going to be middle left end back middle.

Hole 5
Hole 5
About the Hole
Plays as a 353 yard straightaway par 4.
Hole Hacks
This hole does provide an excellent scoring
opportunity if you’re able to find the fairway.
Tips & Tricks
There is a bunker guarding the right hand side of the fairway in the landing area for most players.
For longer hitters if you are able to move the ball from right to left or (draw), you can use this bunker as a good starting point with some draw that will put you in excellent position to make birdie.
The optimum position off the tee is going to be left center to the left side of the fairway.
The green is guarded by a bunker in the front right and one in the back right of the green.
The best areas to miss our short middle and middle left.

Hole 6
Hole 6
About the Hole
Plays as a 345 yard straightaway par 4.
Hole Hacks
There is a small hazard just off the front of the
green that does not come into play off the tee. You have the cleared wooded area almost like a waste area down the entire right-hand side of the hole. This fairway does slope slightly from the top left to bottom right.
Tips & Tricks
There is one bunker guarding the left hand side of the fairway in the landing area.
The optimum position off the t is going to be right center to right side of the fairway, this will provide the best angle for your approach to the green.
The green is guarded by a bunker in the front right as well as a bunker back left and also a bunker in the back right.
The best areas to miss or going to be front middle and short left.

Hole 7
Hole 7
About the Hole
Plays as a 410 yard down hill slightly dogleg left par 4.
Hole Hacks
This is an excellent scoring opportunity late in your front 9. There are no hazards to navigate off the tee. There is what appears to be a small drainage ditch that runs roughly 75 to 100 yards from the green; this is not marked as a hazard.
Tips & Tricks
Right center to right side of the fairway is the optimum position off the tee, this will provide the best angle for your approach shot.
The green is guarded by a bunker in the front left, one in the middle left and one middle
right.
The best area to miss is going to be front right

Hole 8
Hole 8
About the Hole
Plays as a 174 yard uphill par 3.
Hole Hacks
This is a straightforward par 3 with plenty of room left of the green if need be.
Tips & Tricks
This hole does play uphill so make sure you account for the uphill slope when selecting
your club.
There is a large bunker that guards the front side of the green from left to right.
The best areas to miss are going to be short left and middle left.

Hole 9
Hole 9
About the Hole
Plays as a 525 yard straightaway par 5.
Hole Hacks
The fairway does slope from the top right to
bottom left. This is a good par five and a great scoring opportunity to finish your front 9.
Tips & Tricks
For longer headers you may want to challenge the bunker on the top right side of the fairway and if you were able to carry the bunker with a little draw, you will set yourself up for a great chance to make a low score on this hole.
For those playing this as a traditional 3 shot par 5, left center to left side of the fairway is the optimum position for your tee shot.
For those players going for the green and 2 be aware of the small Hazard that runs the width of the fairway roughly 30 yards short of the green. The green is also very well bunkered in the front left front right and back right.
For those playing their second shot as a layup you will want to lay up short of the small creek that runs in front, this will provide roughly a 50-yard shot or so to the green.
The best areas to miss or going to be front middle and middle left.

Hole 10
Hole 10
About the Hole
Plays as a 417 yard dogleg left par 4.
Hole Hacks
The score card rates this as the number to handicap hole on the course, the USDA missed a great
opportunity to award this one the number one handicap hole, this hole does have some teeth to it. There is a large bunker on the left hand side of the fairway in the landing area for most players.
Tips & Tricks
The optimum position off the tee is going to be right center to right side of the fairway, this will provide the best angle for your second shot.
The fairway does slope downhill to the bottom in the low area and then back up slightly
to the green.
The green is guarded by a bunker guarding the back right of the green and one guarding the left hand side of the green.
The best areas to miss are going to be front middle and short right.

Hole 11
Hole 11
About the Hole
Plays as a 354 yard hard dogleg right par 4.
Hole Hacks
There are a few different ways that one can choose to play this hole. I have no doubt that longer hitters off the tee will want to challenge the dogleg and take a more direct route to the green, through the lightly wooded area just shy of the start of the dogleg. There is a bunker on the right side of the fairway right in the heart of the dog leg that would also need to be navigated if trying to take the shortcut.
Tips & Tricks
The fairway does slope from the top left to bottom right.
The optimum position off the tee is going to be left center to left side of the fairway.
The green is guarded by 1 large bunker on the top left side of the green.
The best area to miss is going to be the front middle.

Hole 12
Hole 12
About the Hole
Plays as a 411 yard slight dogleg right par 4.
Hole Hacks
Directly off the front of the tee box there is a small hazard/ creek that runs through the fairway, this should not come into play. There is also a water hazard down the left side of the fairway just as the dogleg to the right starts. This fairway does slope slightly from the top left down to the bottom right.
Tips & Tricks
The optimum position off the tee is going to be left center to the left side of the fairway.
Your approach shot will be slightly uphill to a green that is guarded by a bunker in the front left and back left of the green.
The best areas to miss are going to be front middle and short right.

Hole 13
Hole 13
About the Hole
Plays as a 165 yard par 3.
Hole Hacks
This hole does have a water hazard that comes in just short left of the green.
Tips & Tricks
The green is guarded by a bunker in the middle right of the green.
The best area to miss is going to be front middle to back right. There is room between the bunker and the water hazard on the left hand side but if you don’t have to challenge it I would try not to.

Hole 14
Hole 14
About the Hole
Plays as a 347 yard slight dogleg right par 4.
Hole Hacks
This hole provides an excellent scoring opportunity in the middle of your back 9.
Tips & Tricks
There is a bunker guarding the right side of the fairway.
The optimum position off the t is going to be left center to left side of the fairway, this will provide the best angle at your approach to the green.
The green is guarded by a bunker in the front left and one in the front right.
The best areas to miss are going to be front middle and back right.

Hole 15
Hole 15
About the Hole
Plays as a 538 yard straightaway par 5.
Hole Hacks
There are some houses down the right hand side of this fairway right of the cart path. Down the entire left hand side of this hole you have the cleared wooded area like a hazard. There is one bunker guarding the far right side of the fairway in the landing area for most players.
Tips & Tricks
The optimum position off the tee is going to be left center of the fairway.
For those longer hitters trying to get to the green in 2, there is a large bunker covering the entire front of the green and a large bunker guarding the entire back side of the green.
For those playing this as a traditional 3 shot par 5, laying up to the right center or right side of the fairway does provide a great angle for your approach shot.
The best areas to miss are going to be front left and middle left of the green.

Hole 16
Hole 16
About the Hole
Plays as a 151 yard par 3.
Hole Hacks
You will need to be very accurate with this tee shot. The green is well bunkered with a bunker in the front middle back right and back left of the green.
Tips & Tricks
The best area to miss is going to be the front left of this green.

Hole 17
Hole 17
About the Hole
Plays as a 564 yard dogleg right par 5.
Hole Hacks
This is an excellent par 5 and for a lot of players and it offers a good scoring opportunity. There is a large barn complex at the corner of the dogleg on the right hand side, and a bunker that guards the far left side of the fairway.
Tips & Tricks
For those longer hitters you might start your tee shot just right of the bunker on the left with fade, this will set you up nicely for your second shot.
For those playing this as a traditional 3 shot par five you will want to make sure that you were in the left center to left side of the fairway to take out any opportunity to bring the barn in to play.
There is one large bunker guarding the far left side of the fairway in the landing area for most layup shots. If you are able to lay the ball up in the right center to the right side of the fairway this will be the best angle for your approach.
The green is bunkered by a large bunker that guards the front left of the green and one
guarding the back right.
The best areas to miss are going to be front right and back left.

Hole 18
Hole 18
About the Hole
Plays as a 402 yard straightaway par 4.
Hole Hacks
Off the tee you will need to be aware of the two bunkers guarding the far left side of the landing area.
Tips & Tricks
The optimum position off the tee will be left center to left side of the fairway, this will provide the best angle for your approach.
The green is well bunkered with a bunker guarding the front middle front left and front
right of the green.
The best areas to miss are going to be short right and back right.
