
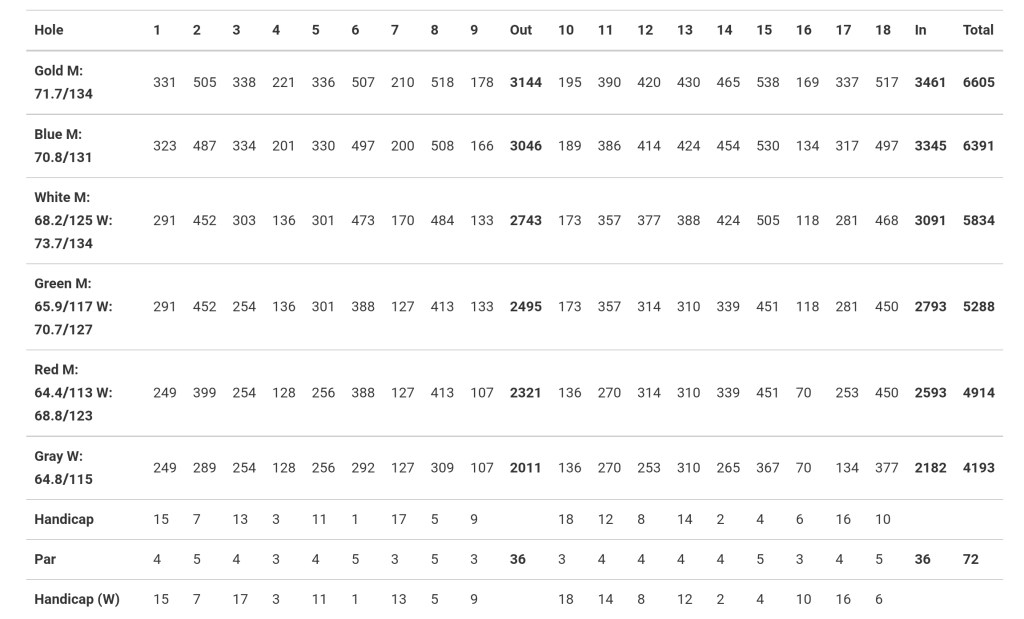
This 18-hole course features four sets of tees with over 6,700 yards from the back of the tee while playing a par 72.
PGE plays Dogwood Trace from its men’s gold tee.
Pinch to zoom; use two fingers to change flyover angle
Range
Range
About the Hole
N/A
Hole Hacks
N/A
Tips & Tricks
N/A
Hole 1
Hole 1
About the Hole
Plays as a 331 yd par 4, slight dogleg left.
Hole Hacks
This hole provides an excellent opportunity to start your round off with a great score.
Tips & Tricks
Longer hitters may want to challenge the bunker guarding the left-hand side of the landing area. If you can carry this bunker with a little fade, you will have a knock down SW (Sand Wedge) into the green.
The optimum position off the tee is right center to right side of the fairway. This position will provide the best angle at your approach to the green.
There is 1 bunker guarding the middle right side of the green.
The best areas to miss are going to be short middle, to short left.
Hole 2
Hole 2
About the Hole
Plays as a 505 yard par 5.
Hole Hacks
This par 5 plays straight away and has out of bounds down the left-hand side of the fairway, in the form of a public road.
Tips & Tricks
There are 2 bunkers that guard the left side of the fairway.
The optimum position off the tee is going to be right center, to right side of the fairway.
For those that can reach the green in 2, there is a bunker that guards the front middle to front left of the green.
For those players playing this as a traditional 3 shot par 5, your second shot is fairly wide open with no hazards to deal with, except the bunker guarding the front left of the green.
If you can lay up to the right side of the fairway, this will provide the best angle for your approach shot.
The best area to miss is going to be front right to middle right of the green.
Hole 3
Hole 3
About the Hole
Plays as a 338 yard par 4 with a slight dogleg left.
Hole Hacks
This par 4 does have out-of-bounds down the entire left side of the hole. Although the out-of-bounds is tight on this hole, this is a wonderful scoring opportunity early in your round.
Tips & Tricks
There are 2 bunkers that guard the landing area on the left side of the fairway. For those longer hitters that may want to try and carry those 2 bunkers, if successful, you set yourself up for a flip wedge or chip to the green.
The optimum position off the tee is going to be right center, to right side of the fairway. This provides the best angle for your approach.
There is 1 bunker that guards the middle right of the green.
As a special note, going long on the green will spell trouble.
Best areas to miss are going to be middle left, and middle right of the green.
Hole 4
Hole 4
About the Hole
Plays as a 221 yard par 3.
Hole Hacks
There is only 1 par 3 on this course under 170 yds, and this is not one of them. This is an extremely demanding par 3, and par here is an excellent score.
Tips & Tricks
There is a hazard that runs roughly the width of the fairway through the middle of this hole .
There are 2 bunkers to navigate on this hole. The first is by the front left, and the other is middle right.
The best area to miss is going to be short middle.
Hole 5
Hole 5
About the Hole
Plays as a 336 yard par 4, hard dogleg left.
Hole Hacks
This is a quirky hole, that when standing on the tee box can be a bit puzzling. The railroad tracks are out of bounds down the entire left side of the fairway.
Tips & Tricks
There are 2 large trees that are in the center of the fairway just as the dogleg left starts. There is a bunker straight away on the far-right side of the fairway, that is very reachable off the tee.
If you are trying to play this hole as it is traditionally shaped, you will need to lay up off the tee just short of the bunker straight away.
Most players should be able to hit the driver on this hole, if you’re able to hit between the two large trees and the cart path. This may look like you are going to miss the fairway to the extreme left, but you will set yourself up for a birdie chance.
There is 1 bunker guarding the short middle of the green.
The best area to miss is going to be short to middle right.
Hole 6
Hole 6
About the Hole
Plays as a 507 yard par 5.
Hole Hacks
This hole plays as a dogleg right off the tee, and then a slight dogleg left to the green. This is the number 1 handicap hole on the course, and if you do not keep it between the tree lines, it certainly plays like it.
Tips & Tricks
Right of the fairway as the landing area starts, you do have a densely wooded area that is extremely difficult to play out of.
There is a bunker to the left of the fairway in the landing area. For longer hitters, if you can start the ball at this bunker with fade, you should be able to get home in 2.
The optimum position off the tee is going to be left center, to the left side of the fairway.
For those playing this as a traditional 3 shot par 5, right center to the right side of the fairway is the optimum layup spot for your best approach to the green.
Your approach shot plays slightly uphill and there is a bunker guarding the front left ofthe green.
The best area to miss is going to be short right, and middle left of the green.
Hole 7
Hole 7
About the Hole
Plays as a 210 yard par 3.
Hole Hacks
There is a water hazard about midway through the hole, that truly should not come into play off the tee.
Tips & Tricks
The green is slightly elevated from the fairway, and there are no bunkers to navigate around the green.
The best areas to miss are going to be short middle, and short left of the green.
Hole 8
Hole 8
About the Hole
Plays as a 518 yard par 5, with a very slight dogleg right off the tee.
Hole Hacks
Very slight dogleg right off the tee.
Tips & Tricks
There is 1 bunker right of the fairway, that guards the landing area.
For longer hitters that can carry this bunker, you should be able to start it right over the left-hand side of the bunker and set yourself up to reach the green in 2.
Optimum position off the tee will be left center, to the left side of the fairway.
For those playing this as a traditional 3 shot par 5, be aware of the bunker to the right of the fairway that comes into play in the landing area of your lay-up shot. For the best angle at the green you will want to lay up to the right center to right side- short of this bunker, or the center of the fairway is also a fantastic position.
The green is guarded by a bunker by the front left, and there is also out of bounds long of the green.
The best area to miss is going to be front middle to front right.
Hole 9
Hole 9
About the Hole
Plays as a 178 yard par 3.
Hole Hacks
There is a water hazard that runs the length of the hole and covers the front left of the green.
Tips & Tricks
There are 2 trees right of the green that overhang the far right side.
There are no bunkers to navigate around the green
The best area to miss is going to be short to middle right.
Hole 10
Hole 10
About the Hole
Plays as a 195 yard par 3.
Hole Hacks
This is a straightforward par-3 to start your back 9.
Tips & Tricks
There are no bunkers that guard the green.
The best areas to miss are going to be front middle, to front left
Hole 11
Hole 11
About the Hole
Plays as a 390 yd par 4, dogleg right.
Hole Hacks
There is a small creek just to the left of the tee box, that should not come into play off the tee.
Tips & Tricks
There is a bunker to the right side of the fairway, in the landing area for most players.
The optimum position off the tee is going to be left center to the left side of the fairway, for the best look at the green for your approach.
There are 2 bunkers to navigate on your approach. The first is short left of the green, and 1 is guarding the middle right of the green.
The best areas to miss are going to be short middle, and middle left of the green.
Hole 12
Hole 12
About the Hole
Plays as a 420 yd straightaway par-4.
Hole Hacks
This hole has a lot going on off the tee. Just left of the tree line, is out of bounds along the railroad track. There is a water hazard about midway down the right side of the fairway.
Tips & Tricks
For longer hitters, you’ll want to make sure to stay left center to left side of the fairway to avoid reaching the water hazard.
The optimum position off the tee would be left center of the fairway, to take the majority of the water hazard out of play on your approach shot.
There are no bunkers to navigate around the green
The best areas to miss are short left, and short right of the green.
Hole 13
Hole 13
About the Hole
Plays as a 430 yard par 4, slight dogleg right.
Hole Hacks
This par 4 has a water hazard directly in front of the tee that should not come into play. There is out of bounds that runs down the entire left side of this hole.
Tips & Tricks
There is a bunker that guards the left side of the fairway in the landing area.
The optimum position off the tee is going to be left center of the fairway.
This is a shared green with the backside being the green for hole number 17.
The green is guarded by a bunker in the front left, and also back right.
The best areas to miss are going to be short middle, and middle right.
Hole 14
Hole 14
About the Hole
Plays as a 465 yard straight-away par 4.
Hole Hacks
This hole plays as the number 2 handicap hole on the course, and certainly has earned that ranking.
Tips & Tricks
There are no hazards to navigate off the tee but be aware of the tree line on both sides.
If you happen to find the tree line, it is sparse enough to be able to advance your ball down the fairway.
The optimum position off the tee is going to be left center, to the left side of the fairway.
There is a water hazard just right of the fairway that guards the front right of the green.
You will need to avoid this water hazard on your approach.
If for any reason you are unable to reach the green in 2 and need to lay up, make sure you stay left center to the left side of the fairway, to avoid the hazard.
The green is guarded by a large bunker in the front right of the green, and 2 bunkers in the back middle.
The best area to miss is going to be middle left.
Hole 15
Hole 15
About the Hole
Plays as a 538 yard par 5, slight dogleg left.
Hole Hacks
This hole is tree lined down both sides of the fairway. There are no other hazards to navigate on this hole.
Tips & Tricks
The optimum position off the tee is right center to right side of the fairway.
For those playing this as a traditional 3 shot par 5, you will want to try and keep your layup shot to the right center to right side of the fairway, as the green sets back to the left of the fairway.
There are no bunkers that guard the green
The best areas to miss are going to be short middle, to short left of the green.
Hole 16
Hole 16
About the Hole
Plays as a 169 yard par 3.
Hole Hacks
This is the only par 3 on the course under 170 yds, and most certainly can be this course’s signature hole.
Tips & Tricks
There is a large water hazard from the front of the tee box, to the front of the green. This par 3 is all carry over water.
There are 2 bunkers that guard the back right to back middle of the green.
The best area to miss is going to be the middle right of the green.
Hole 17
Hole 17
About the Hole
Plays as a 337 yard straight-away par 4.
Hole Hacks
There is a water hazard from the front of the tee box, to the beginning of the fairway. This hazard truly should not come into play, and this is an excellent scoring opportunity late in your round.
Tips & Tricks
There is 1 bunker guarding the right side of the fairway, in the landing area.
The optimum position off the tee is left center, to left side of the fairway.
The backside of the green is shared with hole number 13.
There are 2 bunkers that guard the front left and middle right of the green.
The best areas to miss are going to be short middle, and back left of the green.
Hole 18
Hole 18
About the Hole
Plays as a 517 yard par 5 fairly straight away off the tee, with a hard dogleg right approach to the green.
Hole Hacks
This hole does provide an opportunity to close your round with a good score.
Tips & Tricks
There are a few things to remember when hitting your drive on this hole. Just past the tree line on the right side of the fairway, is the water hazard from hole number 17.
There is a bunker just left of the fairway in the landing area.
The optimum position off the tee is going to be the left center, to left side of the fairway.
For longer hitters that can reach the green in 2, this truly plays as a risk-reward par 5. If you are able to find an opening in the tree line on the right-hand side, you can cut the dog leg here and get home in 2.
For those playing this as a traditional 3 shot par 5, you will want to lay up as far left as possible to avoid the bunkers on the left-hand side of the landing area. There is also 1 on the right side of the landing area. This layup will provide you the best angle for your approach.
The green is slightly uphill and is guarded by a bunker on the middle right of the green.
The best area to miss is short middle to short left.
