
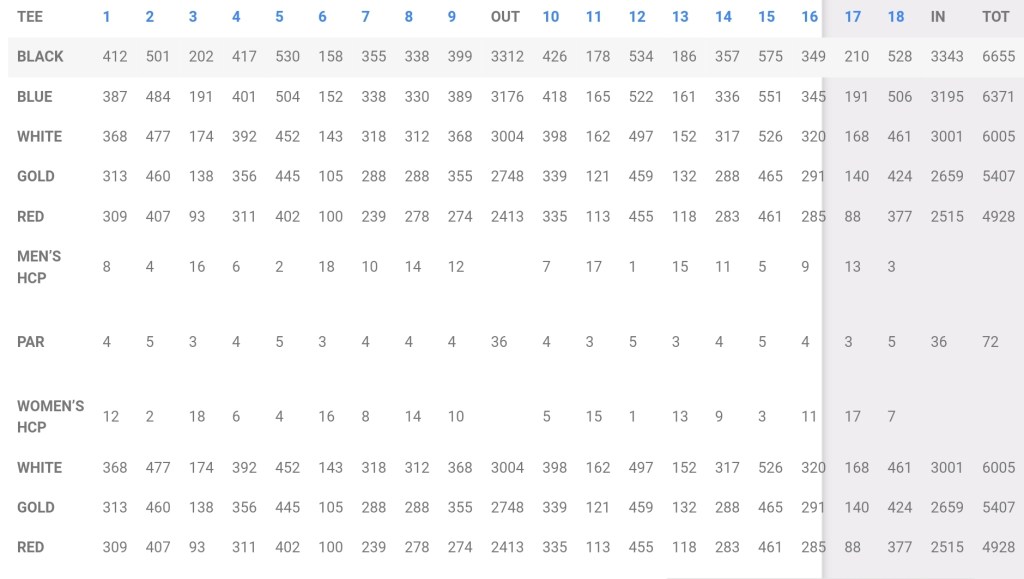
Coupled with value, this 18-hole, par 72, 6.730 yard ( from longest tee) course features five par fives, five par threes, and eight par fours; each hole offers a sense of adventure and unique challenges including 34 well placed bunkers, tree-lined fairways, slopes, and rolls throughout. Brookswood is among one of the most enjoyable and interesting courses offered in the greater Richmond area. (6,730 yards from the longest tee)
Brookwoods Golf Club is played as a 6,655 yard par 71 from the men’s black tees. Brookwoods plays to a course rating of 72.3 and a slope of 130. It certainly does help if you are able to move the ball both right to left and left to right on this golf course. This course will test every shot you have in the bag.
Pinch to zoom; use two fingers to change flyover angle

Range
Range
About the Hole
N/A
Hole Hacks
N/A
Tips & Tricks
N/A

Hole 1
Hole 1
About the Hole
Plays as a 412 yard dogleg left par 4.
Hole Hacks
This is a fairly tight driving hole with the fairway being tree-lined down both the left and right hand sides.
Tips & Tricks
The optimum position of the tee is going to be right center to right side of the fairway, this will provide the best angle for your approach.
The second shot plays slightly uphill to a green that is guarded by a bunker in the front right of the green and back left.
The best areas to miss are going to be front middle and back right.

Hole 2
Hole 2
About the Hole
Plays as a 501 yard dogleg left par 5.
Hole Hacks
This is an excellent scoring opportunity early in the round if you’re able to find the correct sides of the fairway.It is also helpful to know that down the right and left sides of the majority of the fairway is out of bounds.
Tips & Tricks
The optimum position off the tee is going to be right center to right side of the fairway.
For those longer headers that will try to reach the screen in 2, there is a large bunker that covers the front left to the middle left of the green.
For those playing this as a traditional 3 shot par 5, your laugh is fairly straightforward; there are no hazards to negotiate on the layup.
The best areas to miss are going to be front right to middle right.

Hole 3
Hole 3
About the Hole
Plays as a 202 yard slightly downhill par 3.
Hole Hacks
This is a par 3 that is going to make you work hard for that par.
Tips & Tricks
The green is guarded by a bunker in the front right and one in the middle right of the green.
The best areas to miss are going to be front left to middle left of the green.

Hole 4
Hole 4
About the Hole
Plays as 417 yard hard dogleg left par 4.
Hole Hacks
There is out of bounds down the left hand side of the hole just left of the tree line.
Tips & Tricks
The optimum position off the t is going to be right center to right side of the fairway.
The green is guarded by a bunker in the front left of the green and 1 middle right.
The best areas to miss or going to be front middle and back right.

Hole 5
Hole 5
About the Hole
Plays as a 530 yard straightaway par-5 with a late slight dogleg left with your approach shot to the green.
Hole Hacks
There is a neighborhood left of the tree line down the length of the fairway on the left hand side that is out of bounds.
Tips & Tricks
The optimum position off the tee is going to be left center to left side of the fairway.
For those longer hitters that will try to reach the screen in 2, you will need to make sure that you can move the ball from right to left and this green is guarded by two large bunkers one in the front left and one in the front right.
For those playing this as a traditional 3 shot par 5, there are no hazards to negotiate with your layup. you want to lay up to the right center or right side of the fairway to provide the best angle for your approach.
The best areas to miss or going to be front middle and middle right.

Hole 6
Hole 6
About the Hole
Plays as a 158 yard par 3.
Hole Hacks
This par 3 does offer an excellent scoring opportunity with a well-placed tee shot.
Tips & Tricks
The green is guarded by a bunker in the front left and also one in the front right.
The best areas to miss are going to be front middle and back left

Hole 7
Hole 7
About the Hole
Plays as a 355 yard dogleg left par 4.
Hole Hacks
Longer hitters may want to select a fairway wood or utility off of this tee considering there is a water hazard just at the end of the fairway, and very reachable for longer hitters.
Tips & Tricks
Optimum position off the t is going to be right center to right side of the fairway, this will provide the best angle for your approach
Your approach shot will need to carry the water that extends to the very front edge of the green.
There is a bunker that guards the right hand side of the green.
The best area to miss is going to be middle left.

Hole 8
Hole 8
About the Hole
Plays as a 338 yard downhill hard dogleg left par 4.
Hole Hacks
This hole is well tree-lined all the way down the left hand side, which makes it near impossible to get a shot to the green if you are on the left side of the fairway. This hole does provide an excellent scoring opportunity late in your front 9.
Tips & Tricks
The optimum position off the tee is going to be right center to right side of the fairway providing the best angle for your second shot.
The green is guarded by a bunker in the front left and also one in the front right.
The best areas to miss are going to be front middle and middle right.

Hole 9
Hole 9
About the Hole
Plays as a 399 yard uphill dogleg right par 4.
Hole Hacks
For longer headers you may want to challenge the right hand treeline to cut off a little distance for this dogleg.
Tips & Tricks
For longer hitters that choose this line, you can start it just left of the tree line and hit it dead straight; you will not be disappointed with your results. This will most likely result with a short iron into the green.
The optimum position of the tea is going to be left center to the left side of the fairway. This position will provide you the best angle for approach on this uphill shot to the green.
The green is guarded by a bunker in the front left and also one in the front right.
The best areas to miss are going to be front middle and middle left.

Hole 10
Hole 10
About the Hole
Plays as a 426 yard dogleg left par 4.
Hole Hacks
This is a fairly demanding tee shot given that just right of the cart path is out of bounds on the right hand side and it is heavily wooded down the left side.
Tips & Tricks
The optimum position off the tee is going to be right center to right side of the fairway, this will provide the best angle for your approach.
The green is guarded by a bunker in the middle left and also one in the front right.
The best areas to miss are going to be front middle and middle right.

Hole 11
Hole 11
About the Hole
Plays as a 178 yard par 3.
Hole Hacks
The hole is bordered on both sides by out of bounds due to neighborhoods.
Tips & Tricks
The green is guarded by bunkers in the front left and two middle right.
The best areas to miss are going to be front middle in the middle left.

Hole 12
Hole 12
About the Hole
Plays as a 534 yard downhill dogleg right par 5.
Hole Hacks
This hole plays as the number one handicap hole on the course. This is a very tight hole both off the tee and in your layup or approach to the green. There is out of bounds on both sides of the fairway, and you will be facing a blind tee shot.
Tips & Tricks
For longer hitters you can challenge the tree line on the right hand side to take a bit of a shortcut on this hole. If you are able to get the ball started just left of that tree line with a little fade you will set yourself up for an excellent opportunity to get home in 2.
The optimum position off the t is going to be left center to the left side of the fairway.
For those that are trying to reach this green in 2, it does play slightly downhill and you do have a small creek that runs down the entire right side of the fairway and you also have out of bounds down the left side.
For those playing this as a traditional 3 shot par 5, you do have the creek running down the right side and out of bounds left so you want to make sure you are accurate with your layup. If you are laying up for the best angle at your approach try to lay up in the right center to right side of the fairway.
The green is guarded by a bunker in the front left as well as a bunker in the front right.
The best area to miss is going to be front middle.

Hole 13
Hole 13
About the Hole
Plays as a 186 yard slightly downhill par 3.
Hole Hacks
This part 3 does have a water hazard that guards the entire width of the front of the green. This is a fairly large green per square foot for this golf course, so take advantage of the green size on your tee shot.
Tips & Tricks
The green is also guarded by a bunker in the back middle of the green.
The best area to miss is going to be middle right or back right.

Hole 14
Hole 14
About the Hole
Plays as a 357 yard hard dogleg right par 4.
Hole Hacks
If you are a player that can move the ball well from left to right or (fade) off the tee. This hole is set up right in your wheelhouse.There is a small waist area on the far left side of the fairway right in the dogleg, you will need to be aware of this if you hit the ball straight away.
Tips & Tricks
For longer hitters you can certainly challenge the corner of the dogleg on the right hand side by hitting a fade just left of the tree line. This should put you in an excellent position
to score.
The optimum position off the tee is left center of the fairway.
Your second shot or approach is slightly uphill to a green guarded by a bunker in the front middle and one in the back right.
The best area to miss is going to be front middle.

Hole 15
Hole 15
About the Hole
Plays as a 575 yard par 5.
Hole Hacks
There is a very slight dogleg right off the tee, then the hole straightens out through the green.There are very few hazards on this hole to negotiate, except for the out-of-bounds running down both sides of the fairway. This par 5 does provide a good scoring opportunity late in your round.
Tips & Tricks
Optimum position off the tee is going to be left center to left side of the fairway.
For those selected to go for the green in 2, the hole plays as what you see is what you get.
For those playing this as a traditional 3 shot par 5, you will want to try to lay up to the right center or right side of the fairway to give yourself the best angle for approach.
The green is guarded by a bunker short left of the green and a bunker middle left as well as a bunker guarding the middle right of the green.
The best areas to miss are going to be front right and back right.

Hole 16
Hole 16
About the Hole
Plays as a 349 yard hard dogleg left par 4.
Hole Hacks
If you are able to move the ball from right to left (draw), this hole will play right to your strength.
This hole is bordered on both sides by neighborhoods, so there will be out of bounds on both sides.
Tips & Tricks
The optimum position of the tee is going to be right center to right side of the fairway, this will provide the best angle for your slightly uphill approach.
There is one bunker guarding short right of the green.
The best areas to miss are going to be front left and middle left.

Hole 17
Hole 17
About the Hole
Plays as a 210 yard par 3.
Hole Hacks
This hole plays as one of the tougher holes on the course, and is a par 3 that deserves your full attention. Par here is an excellent score.
Tips & Tricks
The green is guarded by a bunker short left of the green.
The best areas to miss are going to be short right to middle right of the green.

Hole 18
Hole 18
About the Hole
Place as a 528 yard par 5, with a few different elevation changes in the fairway.
Hole Hacks
The tee shot is a slight dogleg to the right and slightly uphill. This is a very good finishing hole, that if you are able to keep the ball in play you will have an opportunity to finish with a good score.
Tips & Tricks
The optimum position off the tee is going to be left center to left side of the fairway.
For those longer headers that will try to reach this green in two, keep in mind the last third of this hole is uphill to this green, just make sure you account for the uphill slope when selecting your club for your approach.
For those playing this as a traditional 3 shot par 5, the fairway does go down hill from the landing area and then back up as your approach to the green.
For the best angle at your protests you can lay up in the right center to the right side of the fairway.
The green is guarded by a bunker that covers the front middle of the green and one guarding the far middle right.
The best areas to miss are going to be middle left and back left of the green.
