
Opened in 1990 and renovated in 2011, 2013, and 2014, this course layout offers a traditional, tree- lined rolling terrain and a diverse mix of holes great for year round golfing. Designed by renowned architect Dan Maples.
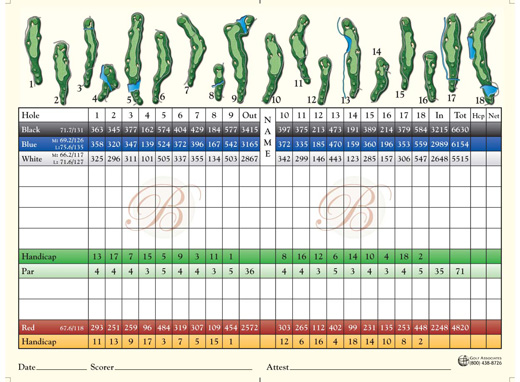
Royal Birkdale or Birkdale Golf Club plays as a 6,644 yd par 71, from the men’s black tees. Black tee indicators can be seen in 360 videos.
Royal Birkdale please to a course rating of 72.0 and to a slope of 133.
Via Acumen Golf, Birkdale offers a special course flyover. Click here to be redirected.
Pinch to zoom; use two fingers to change flyover angle

Range
Range
About the Hole
N/A
Hole Hacks
N/A
Tips & Tricks
N/A

Hole 1
Hole 1
About the Hole
Plays as a 363 yard straightaway par 4.
Hole Hacks
This is an opening hole that you can certainly
take advantage of and create a great scoring opportunity.
Tips & Tricks
There are 2 bunkers that guard the landing area one on the left hand side of the fairway and one guarding the right side.
Left center of the fairway is the optimum position off the tee. This will provide the best
angle for your approach. Trying to create an angle to take the greenside bunkers more out of play.
There is a grouping of 3 bunkers that guard the entire left side of the green.
The best areas to miss are going to be short middle and middle right.

Hole 2
Hole 2
About the Hole
Plays as a 345 yard straightaway par 4.
Hole Hacks
Plays as a 345 yard straightaway par 4. This hhole provides another great scoring opportunity early in your round.
Tips & Tricks
Left center of the fairway is the optimum position off the tee.
There are 2 bunkers that guard the right hand side of the landing area and 1 bunker guarding the far left side of the landing area.
The green is bunkered by one large bunker guarding the entire front side of the green
and one guarding the front left.
The best areas to miss are going to be short middle and back left.

Hole 3
Hole 3
About the Hole
Plays as a 377 yard slight dogleg left par 4.
Hole Hacks
This is another great scoring opportunity early in your round. Taking advantage of these first three holes can get your round off to an excellent start.
Tips & Tricks
Longer hitters may choose to leave the driver in the bag on this hole and hit a fairway wood or utility, considering there is a hazard that runs the width of the fairway roughly 50 yards from the green.
The optimum position off the tee is going to be right center to right side of the fairway.
Do not forget you will need to navigate the hazard roughly 50 yards short of the green.
The green is guarded by a bunker running the length of the right hand side of the green.
The best areas to miss or going to be front middle and middle left.

Hole 4
Hole 4
About the Hole
Plays as a 162 yard par 3.
Hole Hacks
This is a picturesque hole that offers several different hazards to navigate.There is a water hazard guarding left of the green as well as a small creek that runs the width of the fairway roughly 25 yards short of the green.
Tips & Tricks
There are two bunkers that guard the screen one in the front left and one in the front right.
The best areas to miss or going to be front middle and back right.

Hole 5
Hole 5
About the Hole
Plays as a 574 yard straightaway par 5.
Hole Hacks
This is the first par 5 that you come to at Birkdale and it does provide enough trouble to make this a formidable hole. Directly off the tee there is a small hazard that runs the width of the fairway, this is more of a visual hazard and should not come into play off the tee. There are three bunkers that guard the landing area two on the left hand side of the fairway and one on the right.
Tips & Tricks
The optimum position of the tee is going to be left center to the left side of the fairway. This will provide the best angle for either your layup shot or if you are choosing to go for the green in 2.
If you choose to go for the green in 2, the green is well bunkered in the front left and right of the green.
If you are playing this as a traditional three shot par 5 , you will need to make sure to navigate the bunker on the left side of the landing area and also a bunker guarding the right side of the fairway. trying to lay up to the left side of the fairway or left center will
provide the best angle for your approach.
The green is guarded by two bunkers covering the left side of the green and one guarding the middle right.
The best areas to miss are going to be front middle and back right.

Hole 6
Hole 6
About the Hole
Plays as a 404 yard slight dogleg left par 4.
Hole Hacks
You want to make sure to take note that there is out of bounds left of the tree line down the entire left side of this hole. Also just past the fairway bunker guarding the far right side of the fairway in the landing area is also out of bounds continuing down the rest of the right side of the hole.
Tips & Tricks
Right center to the right side of this fairway is the optimum position off the tee to provide the best angle for your approach.
The green is guarded by a bunker in the front middle of the green and one guarding the back middle.
The best area to miss is going to be in front right of the green.

Hole 7
Hole 7
About the Hole
Plays as a 429 yard hard dogleg left par 4.
Hole Hacks
You want to make sure to take note that there is out of bounds left of the tree line down the entire left side of this hole. Also just past the fairway bunker guarding the far right side of the fairway in the landing area is also out of bounds continuing down the rest of the right side of the hole.
Tips & Tricks
For longer hitters that are able to move the ball from right to left or (draw), can align just right of the fairway bunker guarding the left side of the fairway at the beginning of the dogleg, this should provide you an excellent scoring opportunity.
For those players that are not able to carry that bunker guarding the left side, there is a small bunker on the far right side of the fairway right at the beginning of the dogleg that is an excellent line off the tee.
The optimum position off the tee is going to be right center to right side of the fairway.
There are no bunkers that guard this green to navigate.
The best areas to miss are going to be short middle and short right of the green.

Hole 8
Hole 8
About the Hole
Plays as 184 yard straightforward par 3.
Hole Hacks
There is a small hazard that runs through the
width of the fairway that should not come into play off the tee.
Tips & Tricks
There is one bunker guarding the front middle of the green.
The best area to miss is going to be front right to back middle.

Hole 9
Hole 9
About the Hole
Plays as a 577 yd par 5.
Hole Hacks
This is a very uniquely designed par 5, that can provide an excellent scoring opportunity or the chance to bring in a big number.It plays off the tee as a straightaway par 5. and for most players you will have a fairly straight second shot as well. There is a late hard dogleg to this hole on your approach to the green.
Tips & Tricks
There is one bunker guarding the far left side of the fairway that is in the landing area for most players. For longer headers that are able to carry this bunker, you can start it just right of that bunker with fade, and you will set yourself up for an excellent opportunity. For those longer hitters you can also choose to start it down the right side of the fairway with draw and find virtually the same result, it just depends on which way you are more comfortable moving the ball.
The optimum position off the tee is going to be right center of the fairway.
For those playing this as a traditional 3 shot par 5, you will want to make sure that you use the bunker guarding the far end of the fairway straightaway as your aiming point for your layup.
For those that are trying to reach this green in 2, there was a break in the tree line roughly between 225 and 200 yards out from the green that did provide an opportunity to reach the green . You will want to make sure to take note of the water hazard that comes in and covers the entire front of the green as well as guards the entire left side of the
green. If you are able to find this gap in the tree line you will set yourself up for an excellent scoring opportunity.
For those that light up you are now faced with a short iron shot over the water hazard guarding the front of the green as well as a bunker guarding the entire left side of the green and one short right.
The best areas to miss are going to be middle right and short right of the green.

Hole 10
Hole 10
About the Hole
Plays as a 397 yard slight dogleg left par 4.
Hole Hacks
This is an excellent scoring opportunity to start off your back 9. There are two fairway bunkers, one guarding the left hand side and one guarding the right side of the landing area.
Tips & Tricks
Right center of the fairway is the optimum position off the tee. This will provide the best angle for your approach.
The green is guarded by two bunkers 1 in the front left and one guarding the entire right
side of the green.
The best areas to miss or going to be in the front middle and back left.

Hole 11
Hole 11
About the Hole
Plays as a 375 yard dogleg right par 4.
Hole Hacks
This is another excellent scoring opportunity early in your back 9. There are 2 bunkers that guard the far left side of the fairway just before the dogleg starts. There is also a grouping of trees that guard the right hand side of the fairway just as the dogleg begins.
Tips & Tricks
Longer hitters can take advantage of this hole by using the farthest bunker guarding the far left side of the fairway as a starting point with fade, this will put you in a position for a short PW or SW to this green.
The optimum position off the t is going to be left center to left side of the fairway, this will
provide the best angle for your approach.
The green is guarded by a bunker in the front left of the green and also in the front right.
The best areas to miss or going to be front middle and middle right.

Hole 12
Hole 12
About the Hole
Plays as a 213 yd par 3.
Hole Hacks
Despite this holes length it is a fairly benign par 3 with very little trouble to deal with.
Tips & Tricks
The green is guarded by a bunker on the left side of the green and 1 guarding the middle right of the green.
The best areas to miss or going to be front middle and back right.

Hole 13
Hole 13
About the Hole
Plays as a 473 slight dogleg left part 5.
Hole Hacks
This is an excellent scoring opportunity for all
skill levels. There are two bunkers to deal with off the tee, one down the left hand side of the fairway and one just off the fairway to the right, both in the landing area. You also have out of bounds down both sides of the fairway well behind the tree lines.
Tips & Tricks
The optimum position off the tee is the right center to right side of the fairway. This will provide the best angle for your second shot or your approach to the green.
For longer hitters that try to reach the green in 2 just be aware of the bunker guarding the entire front side of the green as well as 2 bunkers short right of the green. This is a very small square footage green, and difficult to hold with your second shot.
For those playing this as a traditional 3 shot par 5, you will want to make sure to lay up either on the left side of the fairway short of the large bar bunker guarding the front of the green, or just left of the 2 bunkers short right of the green.
The best areas to miss are going to be the front right and middle right of the green.

Hole 14
Hole 14
About the Hole
Plays as a 191 yard slightly uphill par 3.
Hole Hacks
This is a straightforward par 3 just remember
when selecting your club to account for the uphill slope.
Tips & Tricks
The green is guarded by a bunker well short of the green and left and one guarding the front right of the green.
The best areas to miss are going to be front middle and middle right

Hole 15
Hole 15
About the Hole
Plays as a 389 yard straightaway par 4.
Hole Hacks
This is another excellent scoring opportunity on
a par 4 nearing the end of your round.
Tips & Tricks
This hole is heavily tree-lined down both sides and both sides also have out of bounds due to neighborhoods bordering the hole.
The optimum position off the tee is going to be left center to left side of the fairway, this will provide the best angle for your approach.
There is a large tree just short of the hazard guarding the front of the green that you will need to navigate on your approach shot, the further left you are in the fairway will mean the less you will need to deal with navigating this tree on your second shot.
The green is guarded by a water hazard that runs the width of the fairway in front and a bunker guarding the entire left side of the green.
The best areas to miss are going to be short right and middle right.

Hole 16
Hole 16
About the Hole
Plays as a 214 yard par 3.
Hole Hacks
This is a tough par 3 and par here should be considered a very good score.
Tips & Tricks
There is one bunker well short of the green and right of the fairway.
The best areas to miss are going to be short middle and middle left.

Hole 17
Hole 17
About the Hole
Plays as a 379 yard par 4.
Hole Hacks
This whole place slightly uphill off the tee to the fairway. There is one bunker guarding the right side of the fairway and one bunker guarding the left hand
side of the fairway in the landing area.
Tips & Tricks
The optimum position off the tee it’s going to be right center to right side of the fairway, this will provide the best angle for your approach.
The green is guarded by a bunker short left of the green as well as one front left of the
green.
The best areas to miss are going to be front middle and short right.

Hole 18
Hole 18
About the Hole
Plays as a 584 yard dogleg right par 4.
Hole Hacks
This is an excellent finishing par 5 that does
provide all you want and then some. There is a small water hazard directly off the tee that should not come into play. There is a small bunker guarding the right side of the fairway in the landing area, there is also a water hazard running down a portion of the left side of the fairway. Longer hitters may be able to reach this water hazard down the left hand side.
Tips & Tricks
The optimum position off the tee is going to be left center to left side of the fairway, this will put you in position to have the best angle at your second shot.
Just past the water hazard on the left hand side are 2 bunkers that guard the layup area.
You want to try to keep your second shot once again to the left center or left side of the fairway for the best angle at your approach.
The green is slightly raised from the Fairway and is guarded by a bunker in the front right
and middle right.
The best areas to miss are going to be front middle and back right.
