
A modern golf facility, designed in 1917 by A.W. Tillinghast, Belmont features a 12-hole traditional golf course, a 6-hole, par 3, short course, and an 18-hole putting course. Both the signature 12 holes and the 6-hole, par 3 is captured via 360 visualization.
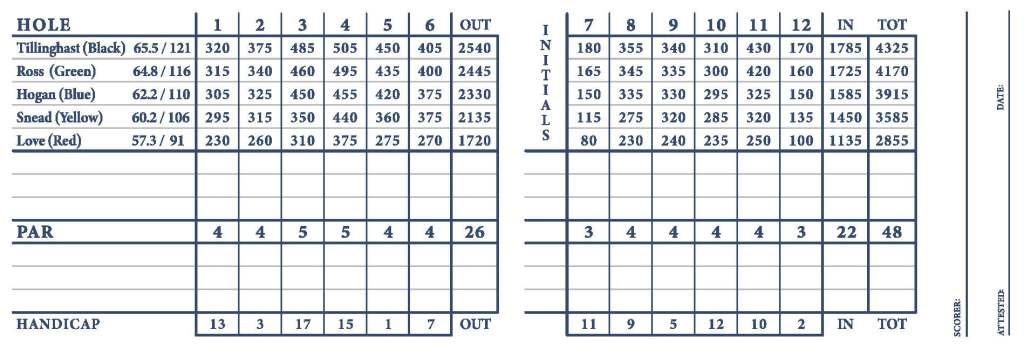
PGE played from the men’s black tee at Belmont. It is important to note that Belmont recently renovated their course. All nationally recognized satellite imagery shows the old course. PGE Flyovers feature the latest and most detailed look at Belmont. Changes reflected are as followed: Hole 7 is now Hole 1, Hole 8 is now Hole 2, Hole 9 is now Hole 3, Hole 10 is Hole 4… Hole 18 is now Hole 12. 3,020 to 4,345 yards.
“The course has two back-to-back Par 5’s, two Par 3’s, eight challenging Par 4’s and 64 bunkers to test and player’s game. With five tees to play from, the course is accessible for all levels.” -Belmont
Pinch to zoom; use two fingers to change flyover angle

Range & Putting Green
Range
About the Hole
N/A
Hole Hacks
N/A
Tips & Tricks
N/A

Hole 1
Hole 1
About the Hole
Plays as a 320 yard par 4.
Hole Hacks
This hole plays slightly downhill, and fairly straight away. This hole provides an excellent scoring opportunity to start your round.
Tips & Tricks
Off the tee, you want to make sure to stay just to the left of a grouping of trees, down the far right side of the fairway.
Optimum position off the tee is left center of the fairway.
This green is well bunkered by a green side bunker left middle, back middle, and right middle.
This green slopes from back to front.
The best area to miss is going to be front middle.

Hole 2
Hole 2
About the Hole
Plays as a 375 yard par 4.
Hole Hacks
This hole plays as a dogleg right and provides a good test of a par 4. Par here is certainly a good score.
Tips & Tricks
For those longer hitters, you may want to stay just left of the cart path with a little fade.
This will most likely leave you no more than a wedge into the green. Make sure to avoid the bunker just right of the cart path at the beginning of the dogleg.
The optimum position off the tee is left center to the left side of the fairway.
This green is guarded by a small creek that runs in front of the green, as well as a bunker right of the green, and short left of the green.
As a special note, it is out of bounds long of the green as there is a road that borders the course.
The best areas to miss are going to be short middle, and back left of the green.

Hole 3
Hole 3
About the Hole
Plays as a 485 yard par 5.
Hole Hacks
This hole plays as a dogleg right. For longer hitters, there is a water hazard left of the cart path that could come into play.
Tips & Tricks
Optimum position off the tee is going to be left center, to left side of the fairway.
For your second shot, you will need to navigate another hard dog leg to the right. There is a bunker that guards the right side of the fairway in the layup area. Make sure to stay left of that bunker.
The approach shot is slightly uphill, to a green that is guarded by bunkers in the front right of the green.
The best areas to miss are the front middle, and middle left of the green.

Hole 4
Hole 4
About the Hole
Plays as a 505 yard par 5.
Hole Hacks
This hole plays as a slight dogleg left. This is a challenging par 5 that requires 5 good shots to make par.
Tips & Tricks
There are 2 bunkers down the left-hand side of the fairway that can come into play in the landing area.
Optimal position of the tee is right center, to the right side of the fairway.
For those longer hitters that are able to reach the green in 2, make sure you have enough club to carry the small hazard that runs the width of the fairway, roughly 20 yards short of the green.
For those playing this as a traditional 3 shot Par 5, there is a small hazard area left of the fairway in the landing zone. Optimum position for the layup would be the right center of the fairway.
The green is guarded by a bunker short left of the green and 1 middle right.

Hole 5
Hole 5
About the Hole
Plays as a fairly straight away 450 yard par 4.
Hole Hacks
There is out of bounds that runs the entire length of this hole on the right. Par here is an excellent score.
Tips & Tricks
There are no fairway bunkers to deal with off the tee. Optimum position off the tee is the left center of the fairway.
There is one bunker fairly short of the green that should not come into play, but is down the left hand side.
The green is bunkered by 1 bunker left of the green, 1 short right, and 1 long right of the green.
Best area to miss is short middle. Be aware that there is out-of-bounds long of the green.

Hole 6
Hole 6
About the Hole
This hole plays fairly straight away as a 405 yard par 4.
Hole Hacks
This hole plays slightly uphill and has no hazards to navigate off the tee.
Tips & Tricks
The optimum position off the tee is left center of the fairway. This provides the best angle for your approach to the green.
The green is guarded by a bunker middle left, and back middle.
The best areas to miss are going to be short left, and short middle.

Hole 7
Hole 7
About the Hole
Plays as a 180 yard par 3 and is slightly downhill.
Hole Hacks
This is one of those par 3’s that you are more than willing to take your 3 and move on to the next hole.
Tips & Tricks
The green is well bunkered. You have a bunker that runs the length of the green on the left, 2 bunkers in the front, and 1 bunker middle right.
The green slopes from back to front, and the best area to miss is going to be long, in the middle of the green.

Hole 8
Hole 8
About the Hole
Plays as a very slight dogleg left 355 yard par 4.
Hole Hacks
This hole provides an excellent scoring opportunity, and there are no hazards to navigate off of the tee.
Tips & Tricks
The optimum position off the tee is right center of the fairway.
The green is guarded by bunkers at the front left, middle left, short right, and middle right of the green.
This green also has out-of-bounds long of the green.

Hole 9
Hole 9
About the Hole
Plays as a slight dogleg left 340 yd par 4.
Hole Hacks
This is a tough driving hole as you cannot see much of the fairway from the tee box. There is a bunker down the middle of the fairway, that you can see from the tee. The bunker is raised above the tee and this is the line you want to use off the tee, in order to ensure you hit the fairway.
Tips & Tricks
Optimum position off the tee is right center of the fairway.
This green is well guarded by 2 trees roughly 25 yards short of the green. You will need to fit it in between these 2 trees for your approach.
There are no hazards to navigate around the green.
The best areas to miss are going to be short middle, and short right.

Hole 10
Hole 10
About the Hole
Plays as a slight dogleg right 310 yard par 4.
Hole Hacks
There is a creek that runs the entire right side of the fairway. The fairway narrows tremendously about 75 yards out from the green. For longer hitters, you may want to consider a fairway wood or utility off the tee.
Tips & Tricks
The left center of the fairway is the optimum position.
The best areas to miss are going to be short middle, and short left.

Hole 11
Hole 11
About the Hole
Plays as a straightaway 430 yard par 4.
Hole Hacks
There are 2 bunkers that guard the landing area left of the cart path. These truly should not come into play off the tee. This hole plays uphill the entire hole.
Tips & Tricks
Optimum position off the tee is to the left center of the fairway.
Your approach shot will be uphill to a green that is guarded by a bunker in the front left, back left, and middle right.
The best areas to miss are short middle, and front right of the green.

Hole 12
Hole 12
About the Hole
Plays as a slightly uphill 170 yard par 3.
Hole Hacks
Par 3 requires an accurate tee shot to finish your round in style.
Tips & Tricks
The green is surrounded by 5 bunkers.
The best area to miss is going to be short middle.

Par 3, 6 Holes
Par 3, 6 Holes
About the Hole
N/A
Hole Hacks
N/A
Tips & Tricks
N/A
